FPGA Bitstream Generation
This page explains how to generate the FPGA bitstream implementing bigPULP, i.e., the PMCA used in HERO, using Xilinx Vivado.
Overview
This HOWTO has been explains how to build three different bigPULP configurations for three different FPGA platforms:
- The
bigpulp-z-70xxplatform implements 1 cluster with 8 cores on the Xilinx Zynq-7000 All-Programmable SoC. This is the standard configuration for HERO. - The
bigpulp-zuxplatform implements currently 1 cluster with 8 cores on the Xilinx Zynq UltraScale+ MPSoC. - The
bigpulpplatform implements 4 clusters with 8 cores each on the Juno ARM Development Platform.
Build system
The following build system was used for this HOWTO:
- CentOS 7 workstation
- Xilinx Vivado 2017.2
- Bash shell
- Python 3.4 with the
pyyamlmodule installed (you can get that withpip3 install pyyaml)
Generated output files
The following files will be generated throughout this HOWTO:
bigpulp*.bitbitstream file containing the FPGA implementation of bigPULPbigpulp*.hdfhardware definition file used for setting up the host software (only for the Xilinx Zynq and Zynq UltraScale+ platforms).
Preparation
Run
git clone git@github.com:pulp-platform/bigpulp.git
to clone the bigPULP GIT repository into your local workspace directory. Execute
cd bigpulp
./update-ips
to enter the project folder and download all required IP cores, solve dependencies and generate the scripts including all required source files in Xilinx Vivado.
Then, type
cd fpga
to enter the fpga directory. Open the script sourceme.sh and adjust it to your needs. Select your target board using the BOARD variable, adjust the path to your Xilinx SDK directory using the SDK_WORKSPACE variable (Vivado will export the output files to this directory), and adjust the path to the Vivado-specific simulation libraries (used for simulation only).
Next, source the sourceme.sh
source sourceme.sh
and source your Vivado environment.
From IP cores to FPGA bitstream
After having downloaded the PULP IP cores, having set up and sourced the sourceme.sh script, and having sourced the Xilinx Vivado environment, the actual generation of the FPGA configuration can be started.
This whole procedure can be grouped into three main steps:
- Generation Xilinx IP cores
- Synthesis of the PULP cluster and SoC netlist
- Top-level Synthesis and FPGA bitstream generation
Xilinx IP core generation
Most of the IP cores inside bigPULP are open-source IPs from the PULP plaform on GitHub. However, there are a few blocks, such as the clock manager and the mailbox (the red blocks in the figures below), which are implemented using Xilinx IP cores.
These need to be generated before the synthesis of the PULP cluster and the SoC can be started. To this end, execute
make ips
to let Vivado generate all Xilinx IP cores used inside bigPULP.
Cluster and SoC synthesis
After having generated the Xilinx IP cores, the synthesis of the bigPULP can be started. This task is done in two steps. First, execute
make synth-pulp_cluster
to synthesize the PULP cluster. The produced netlist is then used to generate PULP SoC. As shown in the figure below, th PULP SoC can instantiate one or multiple clusters.
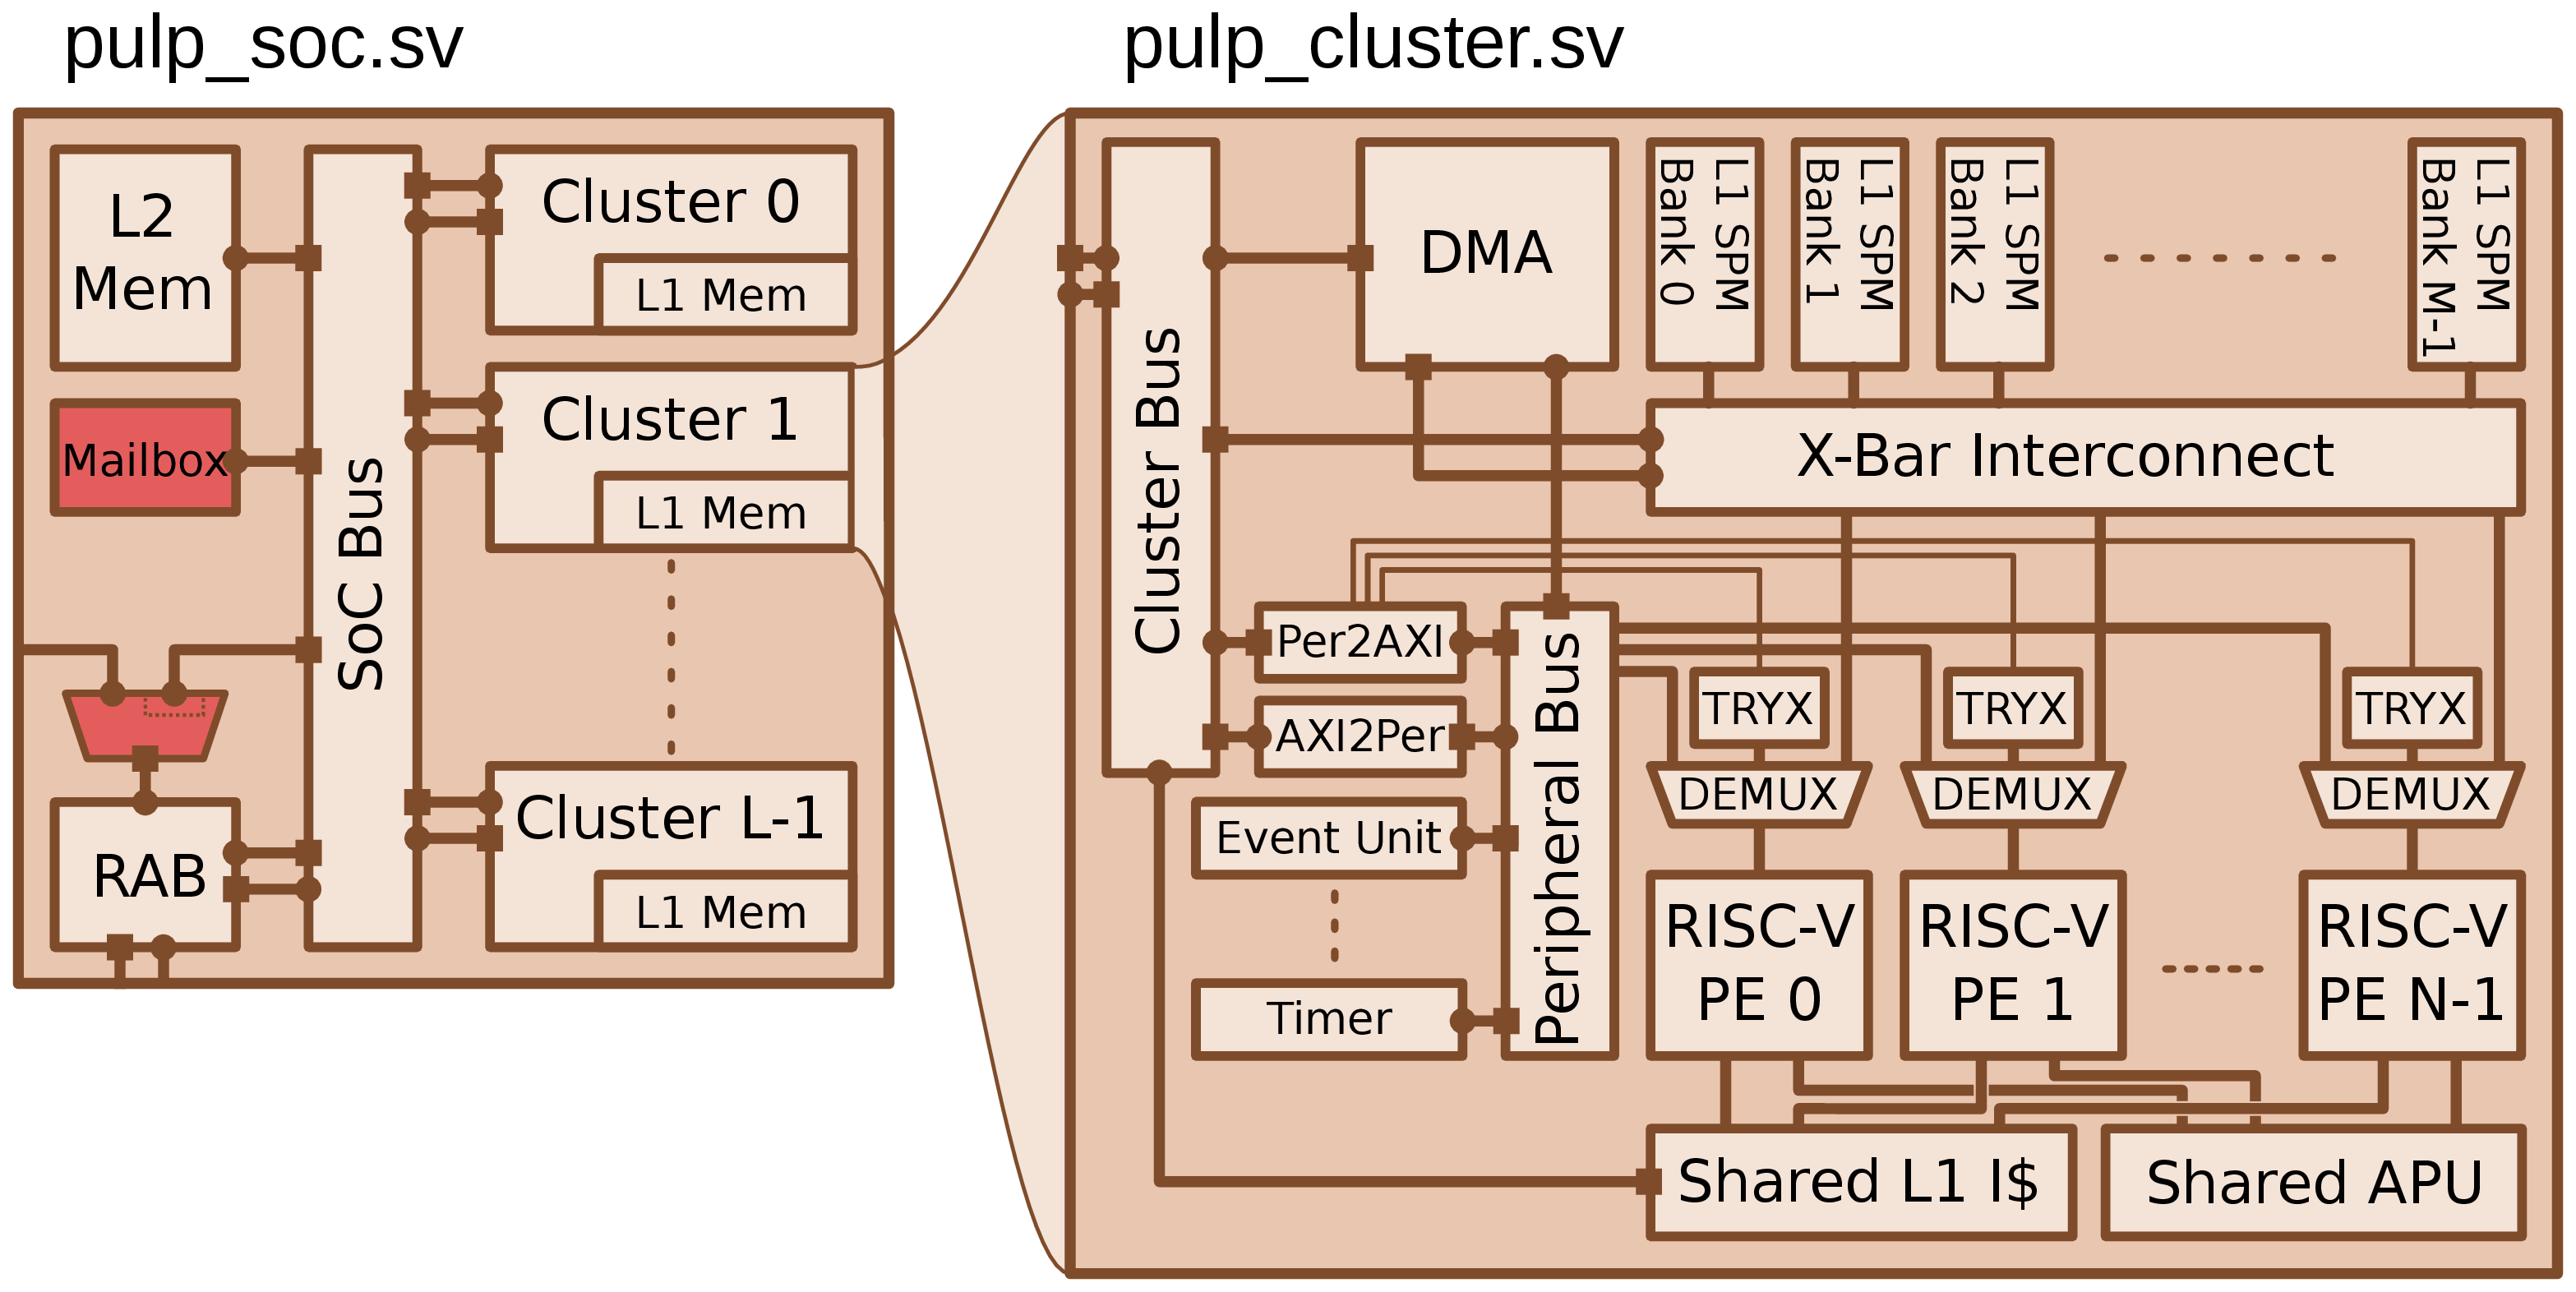
Execute
make synth-pulp_soc
to let Vivado generate the PULP SoC netlist.
Top-level synthesis & bitstream generation
Once the netlist of the PULP SoC has been generated, the top-level design including the PULP SoC and the host interfaces can be synthesized and the FPGA bitstream generated. Depending on the selected FPGA platform, a different top-level project is used.
For the designs based on the Xilinx Zynq-7000 All-Programmable SoC, the bigpulp-z-70xx project is used.
Execute
cd bigpulp-z-70xx
make clean gui
to enter the project folder, start Xilinx Vivado, synthesize the top-level netlist and and generate the FPGA bitstream.
An overview of the top-level design is given in the figure below.
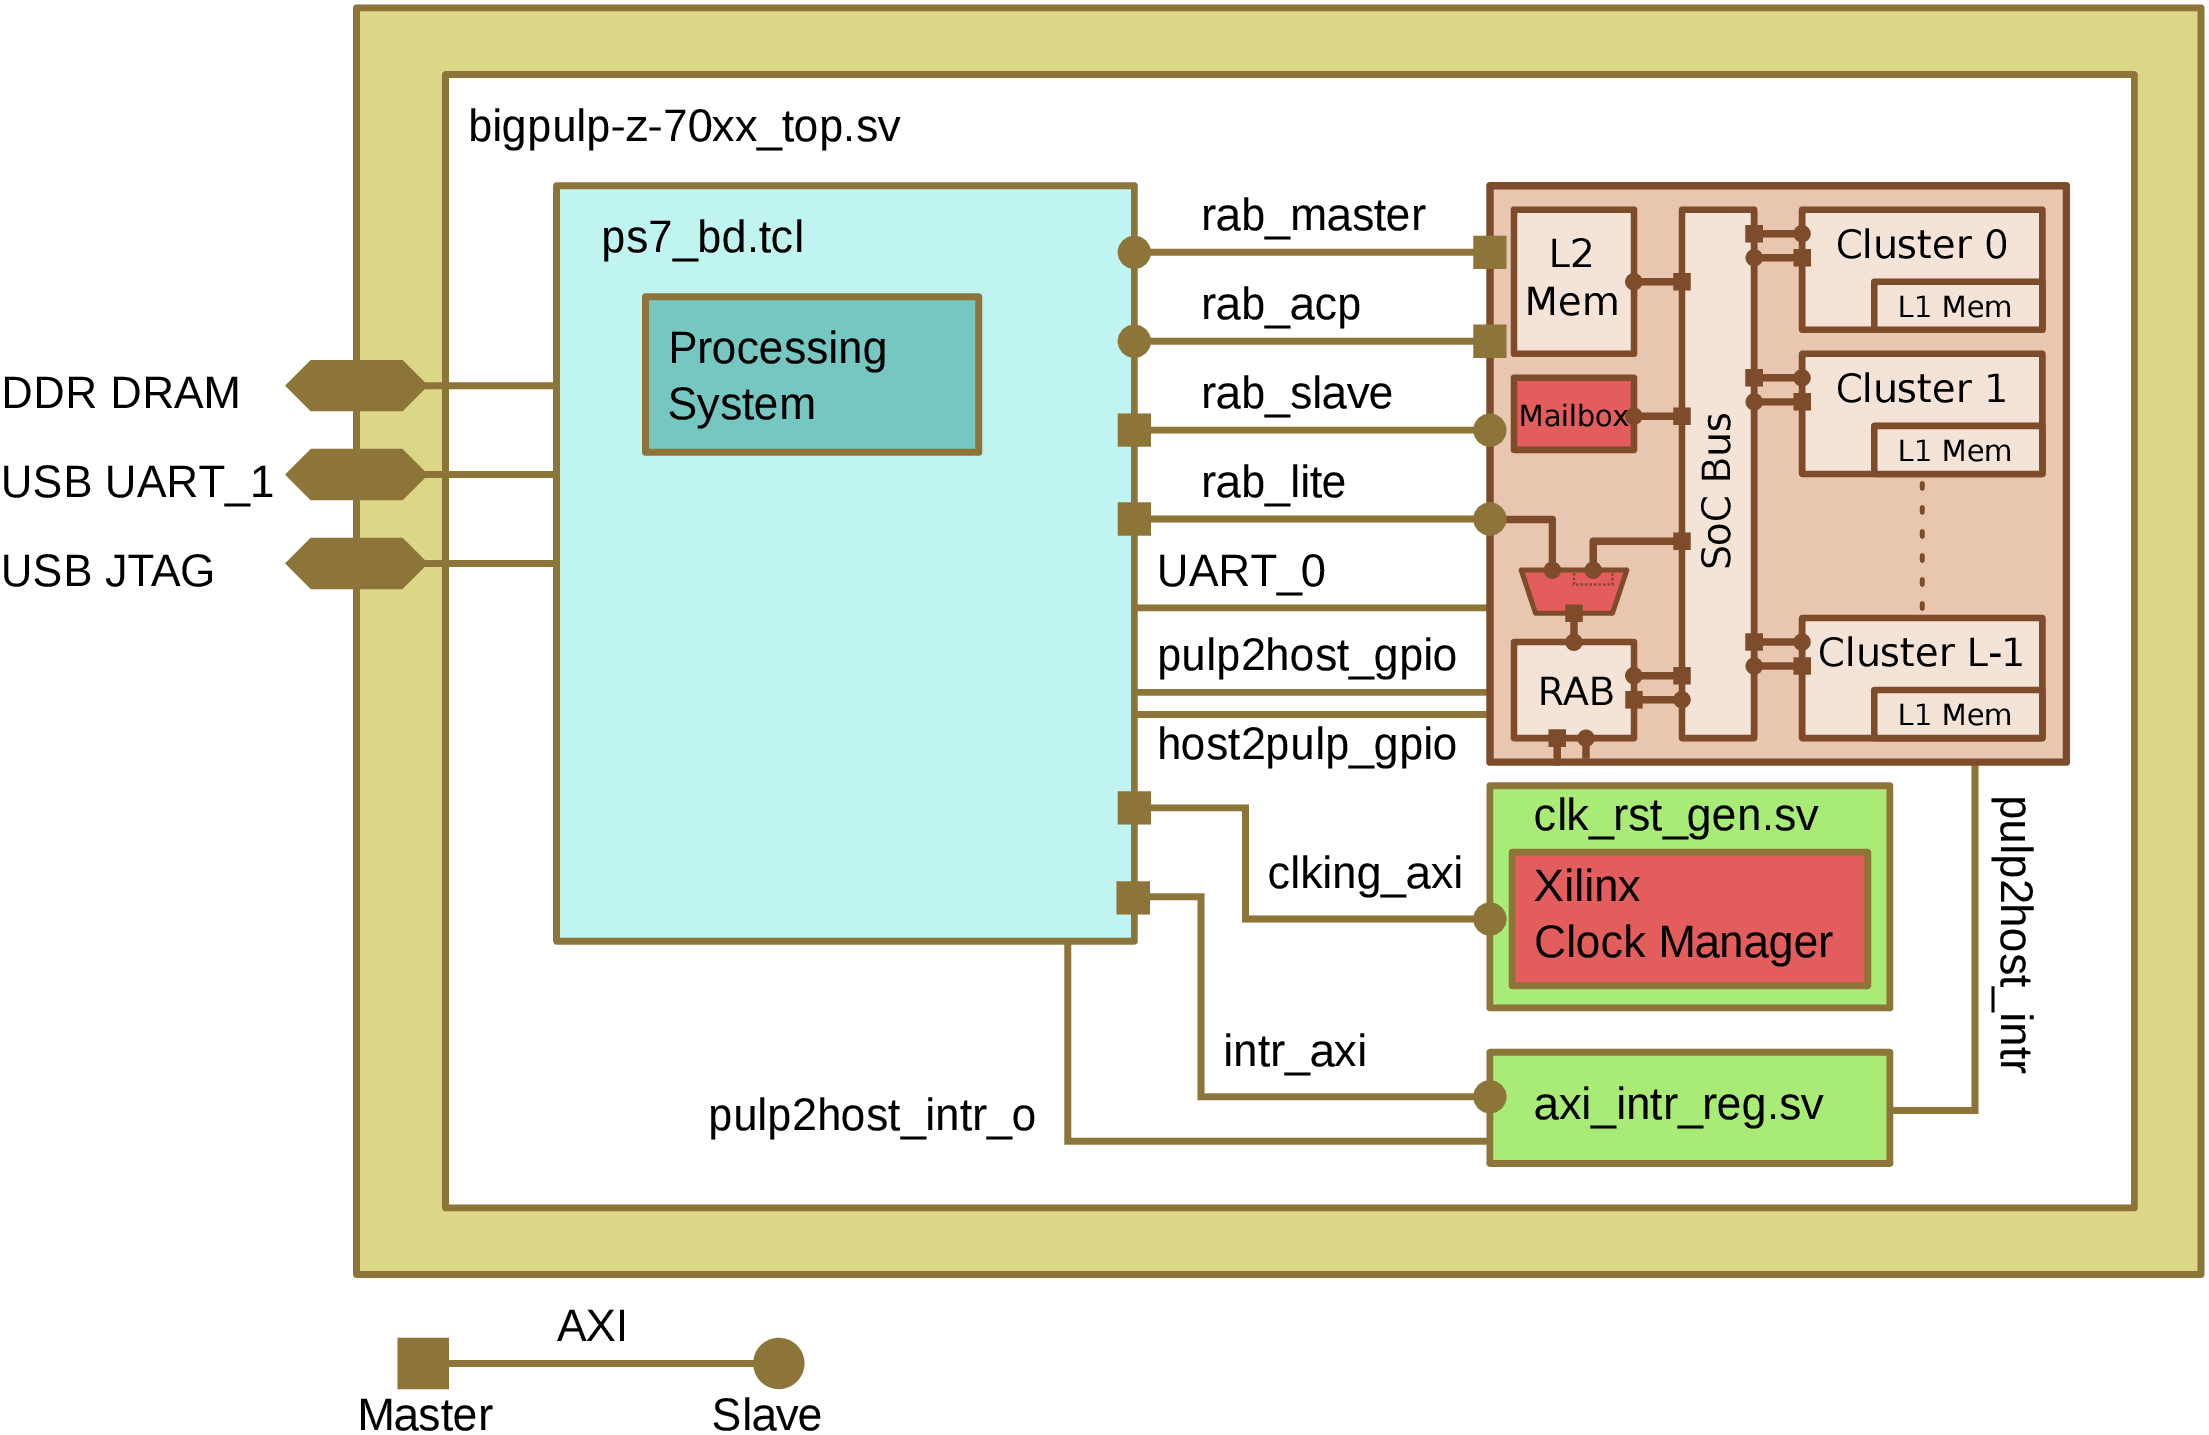
The top-level design consists of several components:
- the
pulp_socnetlist generated in the previous step (rust), - additional IP cores built from RTL sources (green),
- Xilinx IP cores (red), and
- the processing system wrapper generated in Vivado Block Design mode (light blue). This block contains all but Xilinx IP cores including the ARM processing system, i.e., the actual host, and the interface IPs to connect bigPULP to the host.
On the Zynq-based platform, the output generated by printf() on bigPULP are sent to the UART_0 UART interface of the host. The UART_1 interface connects to the USB UART chip on the board and is used to interface the host with a workstation. The USB JTAG connection of the Zynq can be used to debug the system without interfering with the Linux system running on the host.
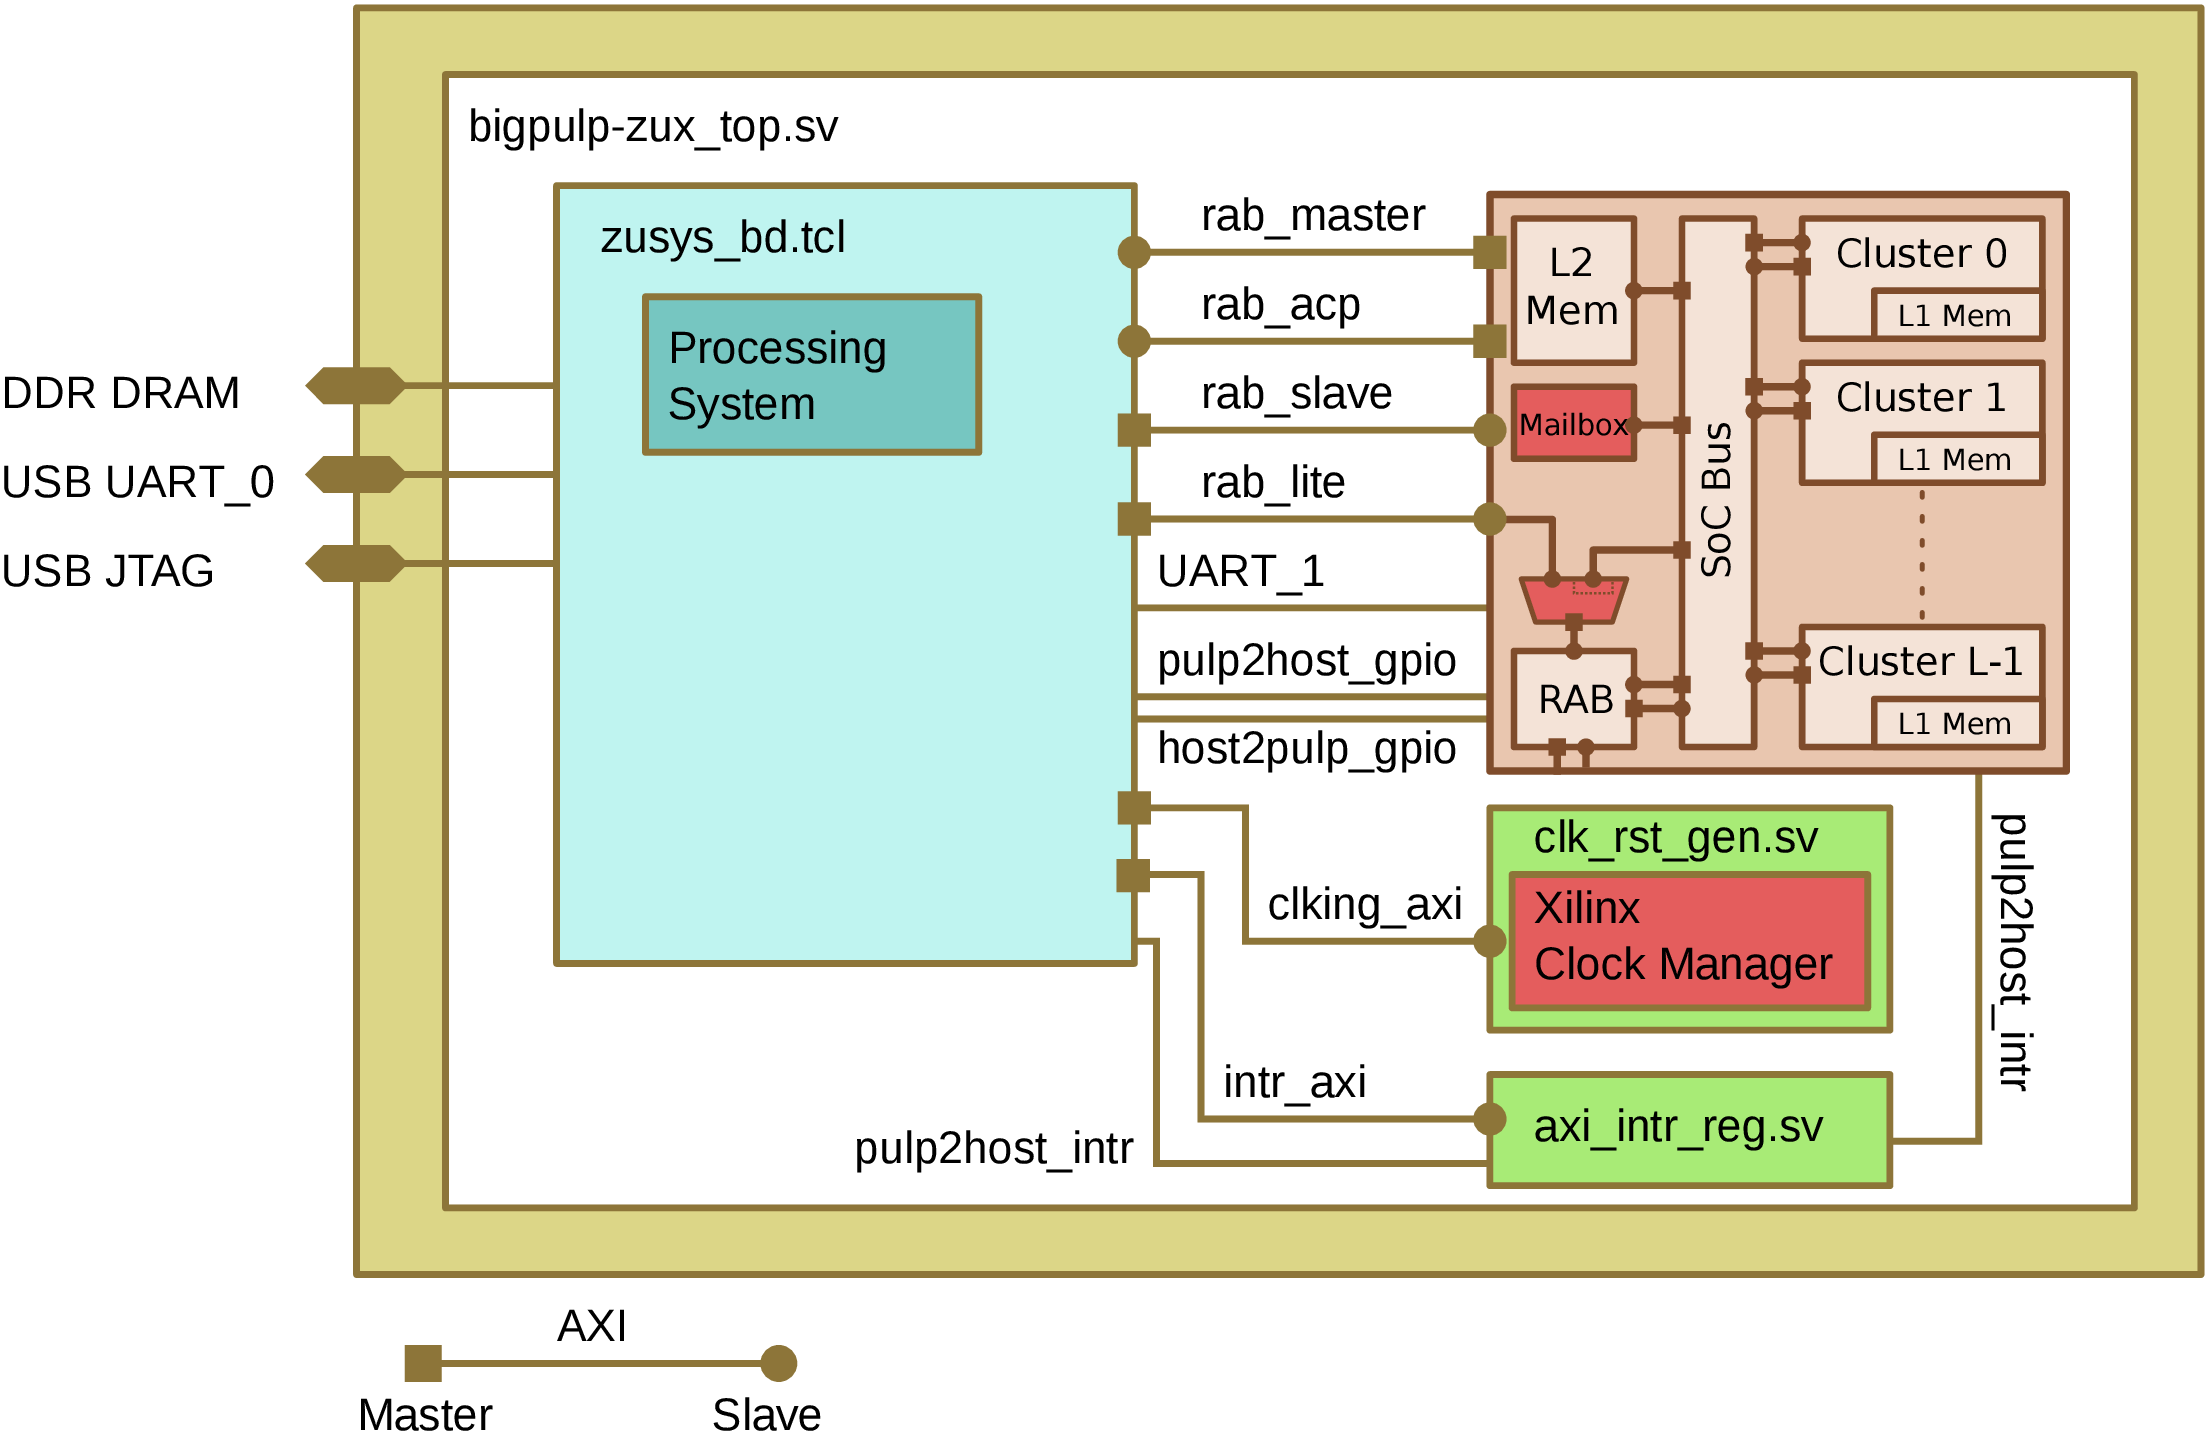
If you target another FPGA platform, a different top-level project must be used.
The figure below shows the top-level design for bigpulp-zux, i.e., when targeting the Xilinx Zynq UltraScale+ MPSoC.
The figure below shows the top-level design for bigpulp, i.e., when targeting the Juno ARM Development Platform.
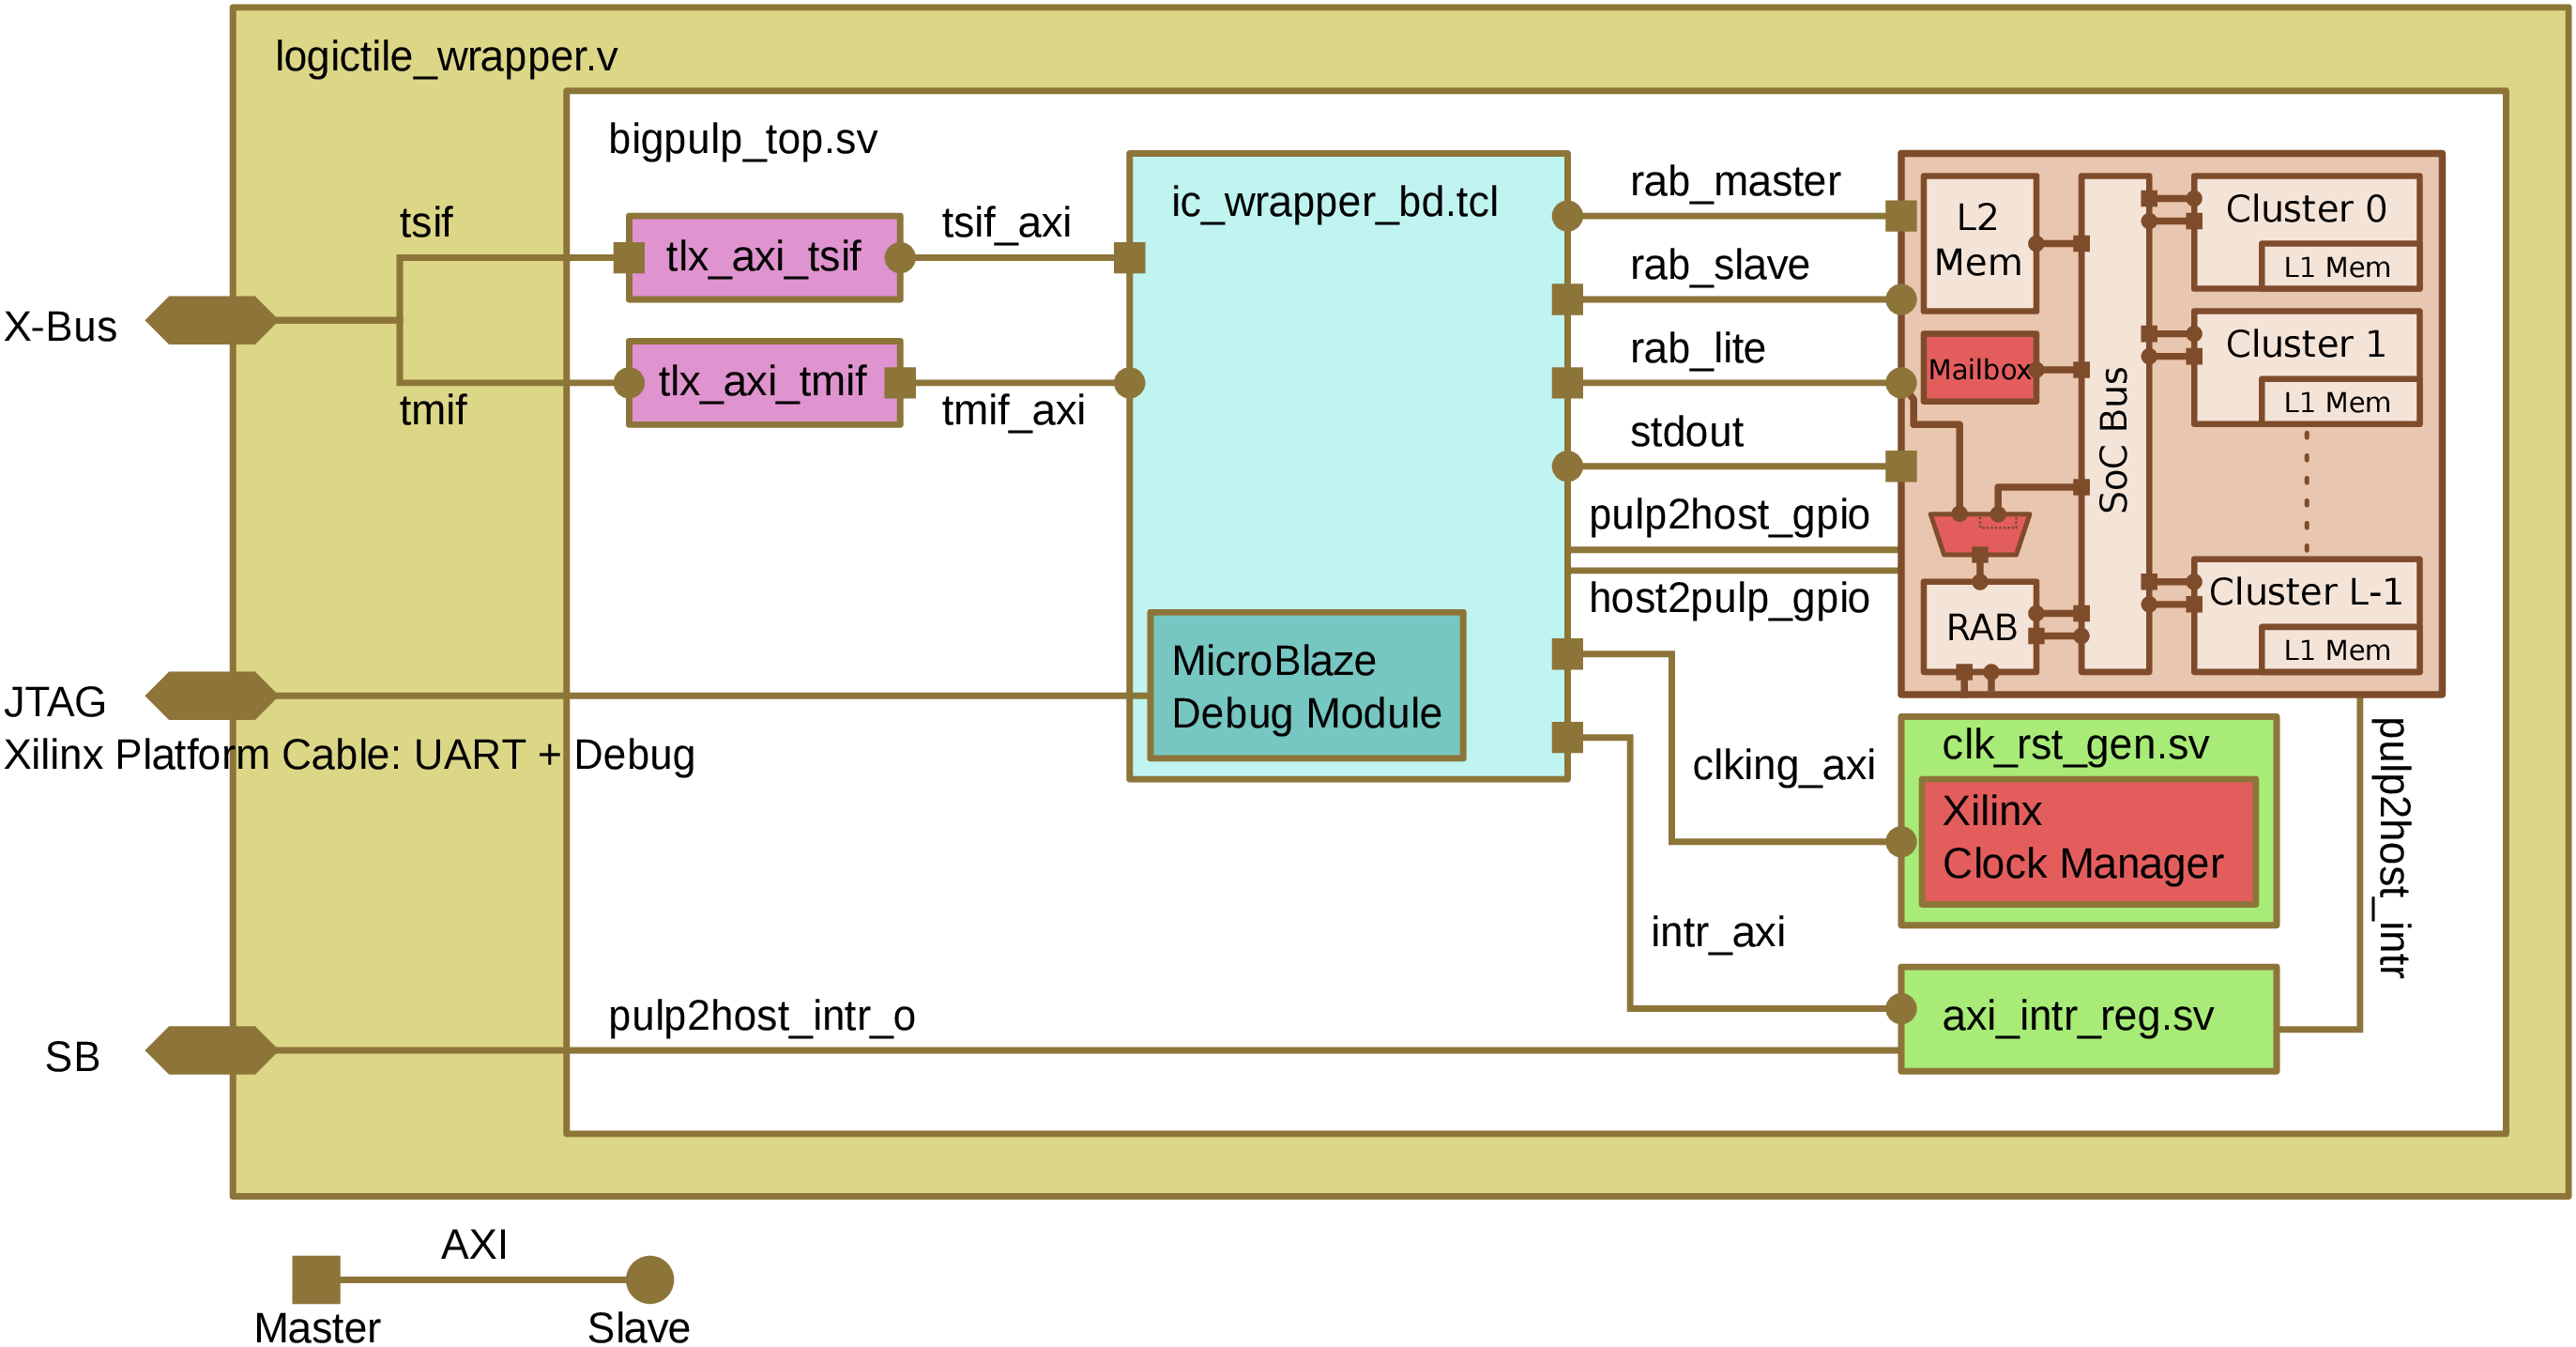
Compared to the other top-level designs, there are a couple of differences.
- The host is not part of the top-level design. Instead, the
ic_wrappergenerated in Vivado Block Design mode interfaces thepulp_socwith the Thin-Link converters (pink) that connect the FPGA with the separate Juno SoC. - The output generated by
printf()on bigPULP is routed to the MicroBlaze debug module through thestdoutAXI interface. Using a Xilinx Platform Cable, theprintf()output can then be visualized on a separate workstation.
NOTE: The two .dcp blackbox netlists for the Thin-Link converters as well as the top-level wrapper logictile_wrapper.v are available only directly from ARM and cannot be redistributed.
For internal development, download the juno-supportrepository from the internal GitLab server and configure JUNO_SUPPORT_PATH in sourceme.sh accordingly.
Once the bitstream and hardware definition file have been generated, they can be used to generate the host software.