ZynqLinux
This page explains how to build and configure the host Linux system for HERO using the Xilinx Linux sources and Buildroot, we refer to this flow as the ZynqLinux flow. This HOWTO is for HERO based on the Xilinx Zynq-7000 All-Programmable SoC.
Overview
The specific board used for this HOWTO is the Xilinx ZC706 Evaluation Kit. However, it should also work for similar boards such as the Mini-ITX Board or the ZedBoard (if the hardware can be made to fit the smaller FPGA device) from Digilent.
Build system
The following build system was used for this HOWTO:
- CentOS 7 workstation
- Xilinx Vivado 2017.2 with SDK
- Bash shell
Required input files
The following files are required for this HOWTO:
bigpulp-z-70xx.hdfhardware definition file exported from Vivadobigpulp-z-70xx.bitbitstream file generated by Vivado- the helper scripts provided in the
hero-supportGIT repository
Generated output files
The following files will be generated throughout this HOWTO:
BOOT.binconsisting of- First-stage boot loader (FSBL) image
- U-Boot boot loader
- FPGA bitstream
uImageLinux kernel imagedevicetree.dtbdevice tree bloburamdisk.image.gzroot filesystem image
To boot the platform, these files need to be copied to the boot partition of the SD card. The figure below gives an overview of the different steps and the dependencies.
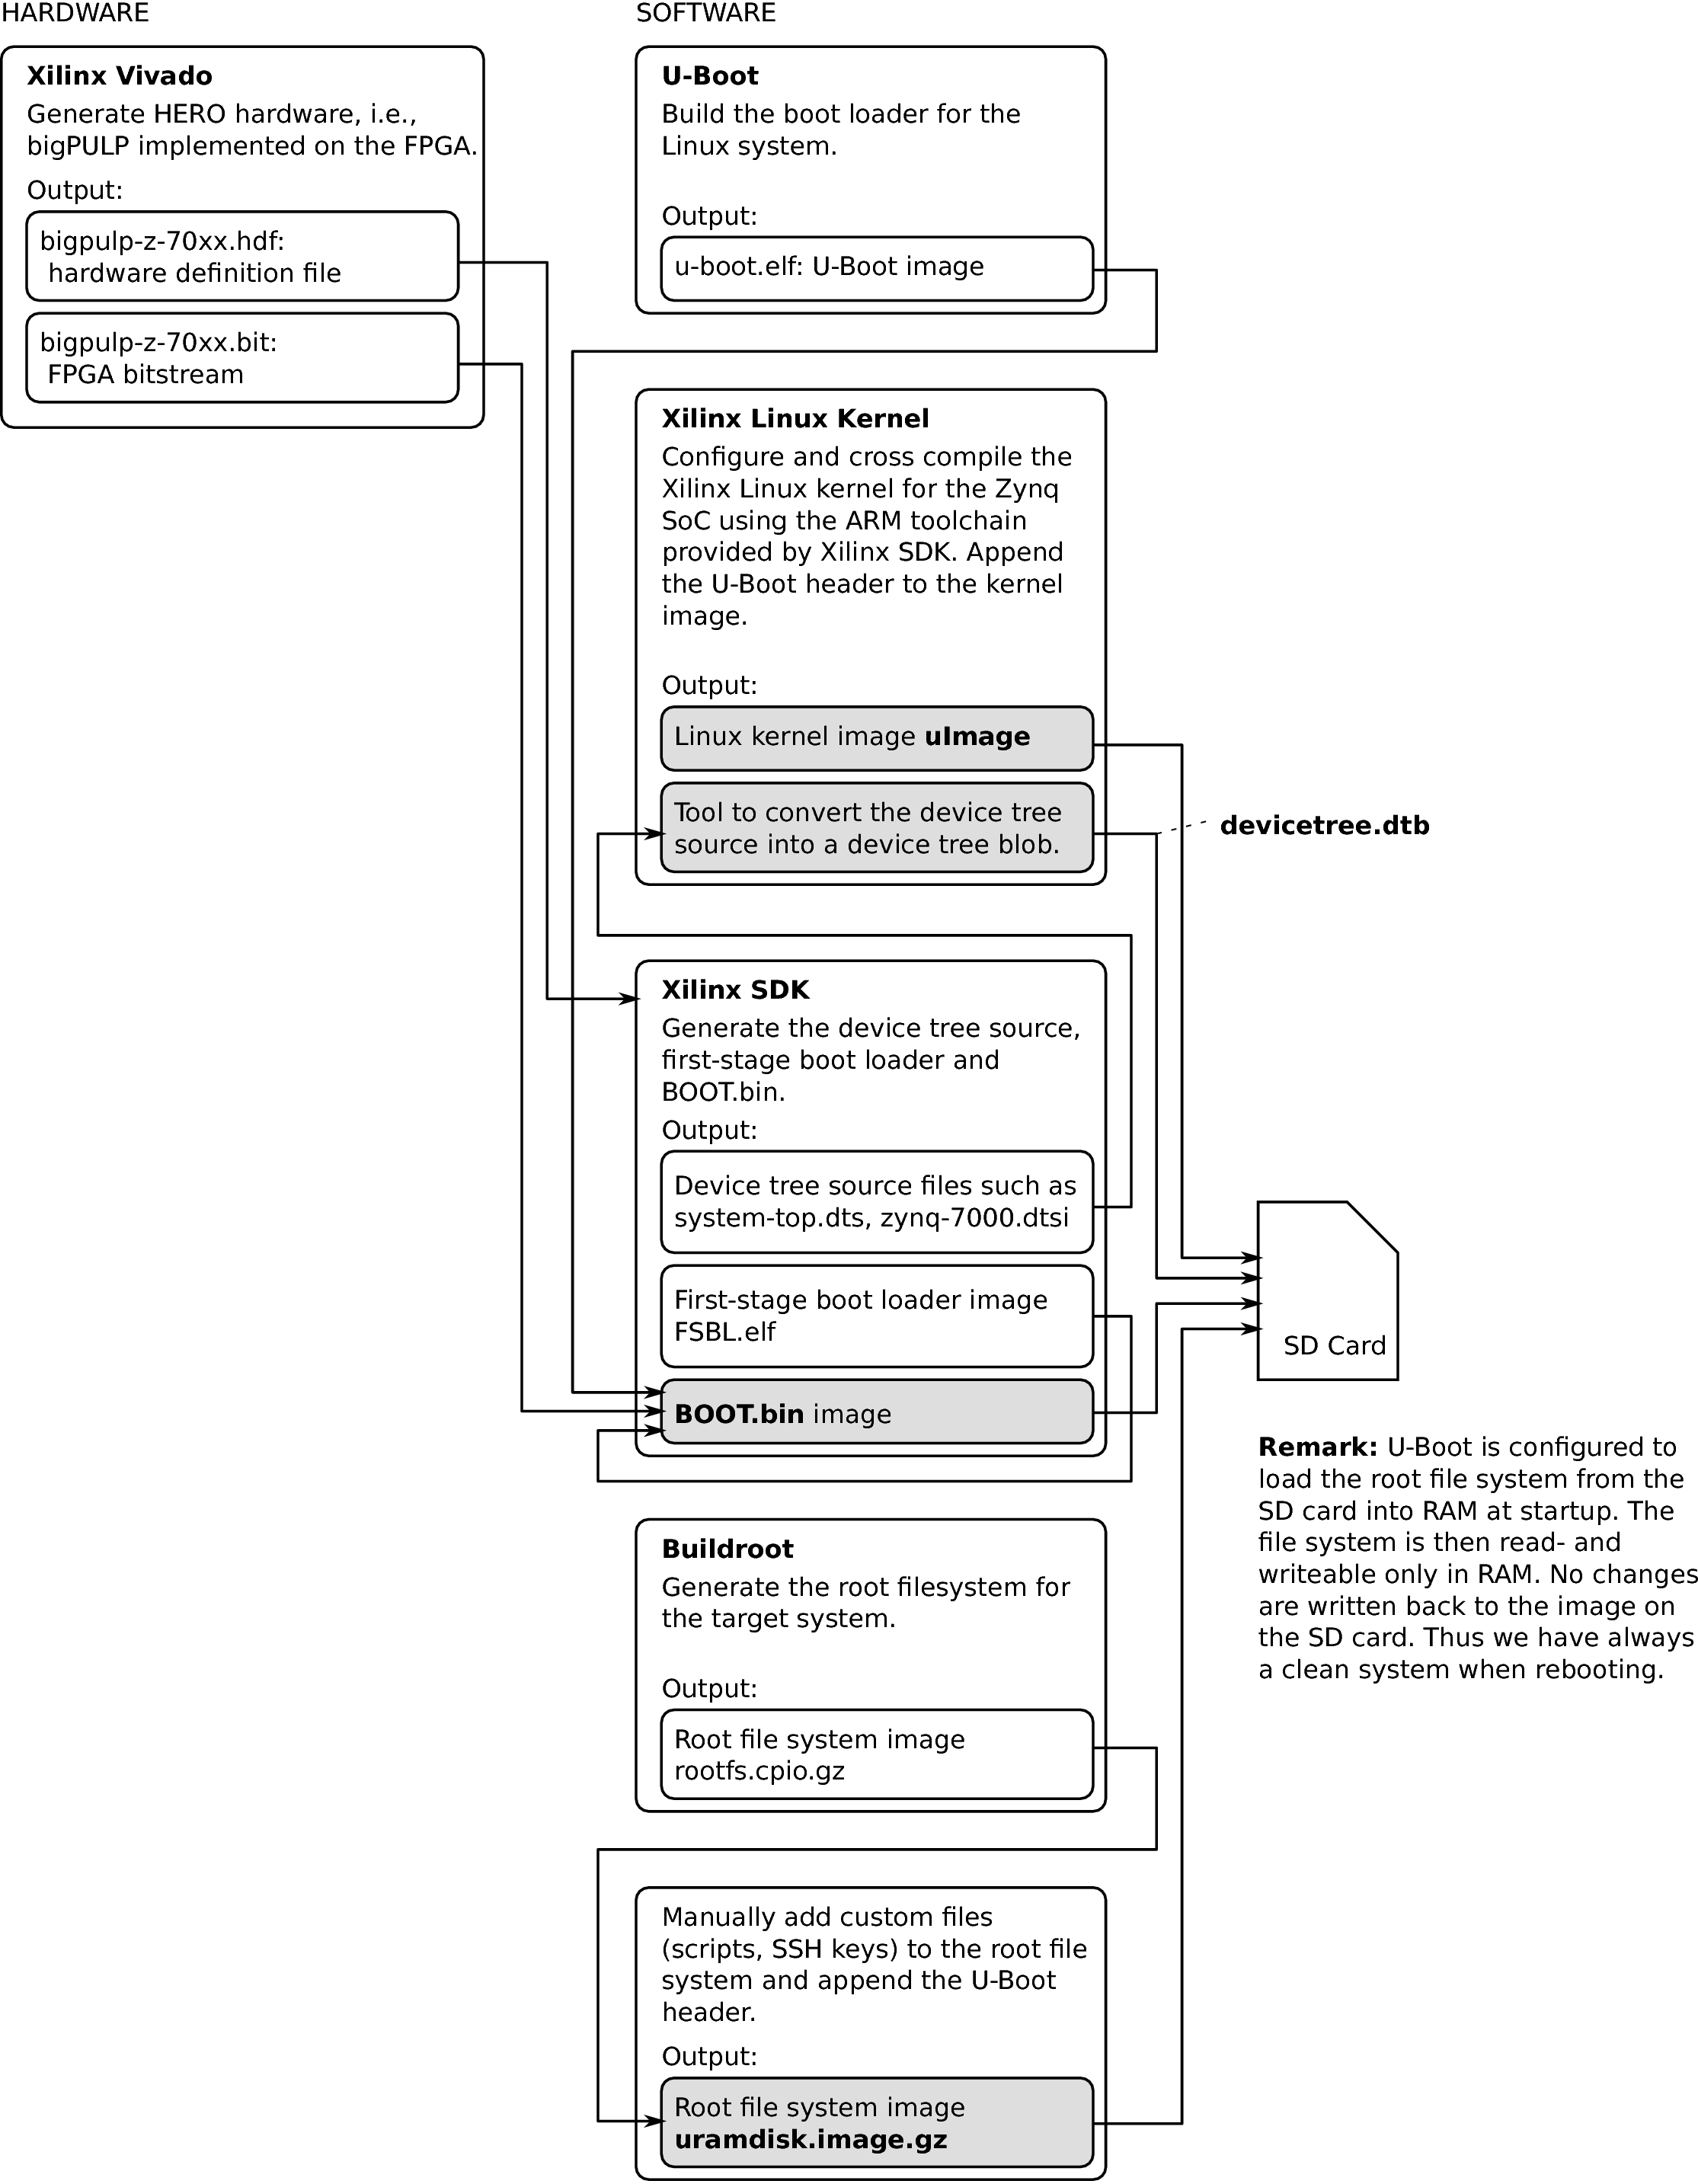
NOTE: With the default configuration used also by this tutorial, U-Boot loads the root filesystem image from the SD card into memory at startup. The filesystem is then read- and writeable only in memory (RAMDISK). No changes are written back to the image on the SD card. From a point of usability, this is not ideal. However, there are several important advantages:
- No filesystem inconsistency and corruption can occur, for example due to system crashes, SD card wearout.
- Very fast startup
- Reduced SD card wearout
It is however recommended to setup either a second data partition on the SD card or and network file system (NFS) share and mount this for permanent storage. In the case of the latter, filesystem consistency is handled by the NFS server, which helps to avoid data corruption. This tutorial shows how to include the required scripts to (automatically) mount an NFS share at startup.
Project Setup
Create a new workspace directory on your local scratch partition. Throughout this HOWTO, we assume this directory to be
/scratch/${USER}/${BOARD}/zynqlinux
Where ${BOARD} has been set to zc706 for this HOWTO.
Copy all files from within linux/zynqlinux/scripts/ inside hero-support to the new workspace directory. Navigate to the workspace directory, source your Vivado environment script and run
./setup.sh
to build up the required directory structure, clone the required Xilinx GIT repositories and checkout the proper tags, and to copy the provided helper files to the appropriate directories.
Xilinx Linux Kernel
Navigate to the folder linux-xlnx inside the workspace directory. Run
make ARCH=arm CROSS_COMPILE=arm-xilinx-linux-gnueabi- xilinx_zynq_defconfig
to load the default kernel configuration for the Xilinx Zynq SoC. Next, overwrite the new configuration with the provided kernel-config file. To this end, execute
cp kernel-config .config
To further customize the Linux kernel using menuconfig, run
make ARCH=arm CROSS_COMPILE=arm-xilinx-linux-gnueabi- menuconfig
If you have applied to changes, save and exit menuconfig.
Finally, execute
./compile_kernel.sh -j8
to cross compile the Xilinx Linux kernel on your workstation, e.g., with 8 threads. The script automatically copies the generated uImage to the sd_image directory. It requires the mkimage tool generated when building U-Boot to append an additional header to the image which allows U-Boot to verify that the kernel can indeed be loaded.
Similarly, also compile the modules to be integrated into the root filesystem image using
./compile_modules.sh -j8
the generated files can be found in lib_modules will automatically be copied to the directory root_filesystem/custom_files/lib/modules.
U-Boot
The universal boot loader U-Boot is used to load the images of the Linux kernel and the root filesystem, and providing the device tree to the kernel during the boot process of the system. It supports many different architectures, e.g., PowerPC, ARM, x86 and target boards such as the ZC706 from Xilinx or the Digilent ZedBoard.
Navigate to the folder u-boot-xlnx inside the workspace directory and run
./compile_loader.sh -j8
to build U-Boot with the default configuration for the ZC706 board, and to copy the output file to the SDK workspace.
NOTE: To build U-Boot for a different board, open and modify the script compile_loader.sh. For example, change zynq_zc706_config to
zynq_zed_config
for the ZedBoard.
Device Tree
The device tree can be viewed as a summary of the hardware configuration of the system and is parsed by the Linux kernel at system startup. In a first step, the device tree sources are generated out of the hardware definition file exported by Vivado. In the second step, these sources are compiled to obtain the binary device tree blob.
Device Tree Sources
The device tree sources can be generated out of the hardware definiton file, i.e., the bigpulp-z-70xx.hdf file exported by Vivado, which is the only interface between the hardware and software build processes. To this end, the Xilinx Device Tree Generator and Xilinx Software Development Kit (SDK) is used.
Open a terminal, navigate to the folder sdk inside the workspace directory and open Xilinx SDK by running
xsdk
Then, select the current folder as SDK workspace.
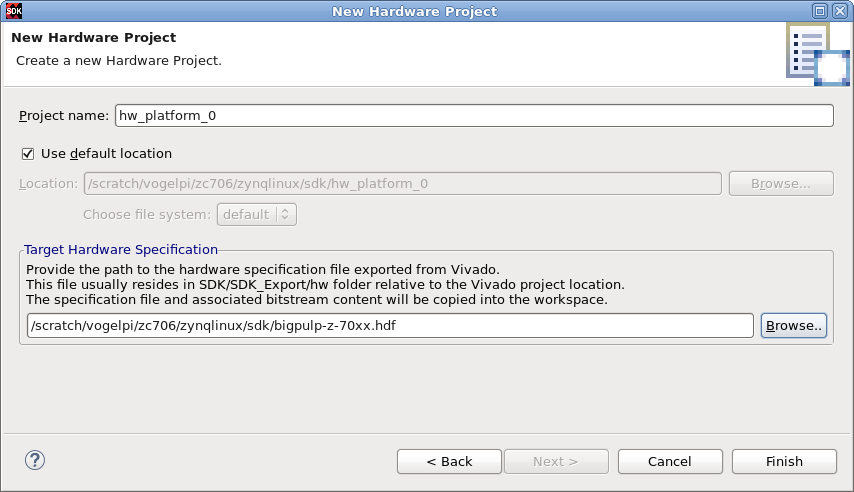
Create a new project under File -> New -> Project. Select Xilinx -> Hardware Platform Specification. Enter a project name and specify the path to your .hdf file as shwon in the figure below. Click Finish.
Next, select Xilinx Tools -> Repositories. Add a new local repository by clicking on New, enter the path to the directory containing the device tree generator sources downloaded earlier
/scratch/${USER}/${BOARD}/zynqlinux/device-tree-xlnx
and click OK. Close the Preferences window by clicking OK. Now, the device tree sources can be generated. To do so, select File -> New -> Board Support Package. A dialog box similar to the one shown in figure below will be displayed.
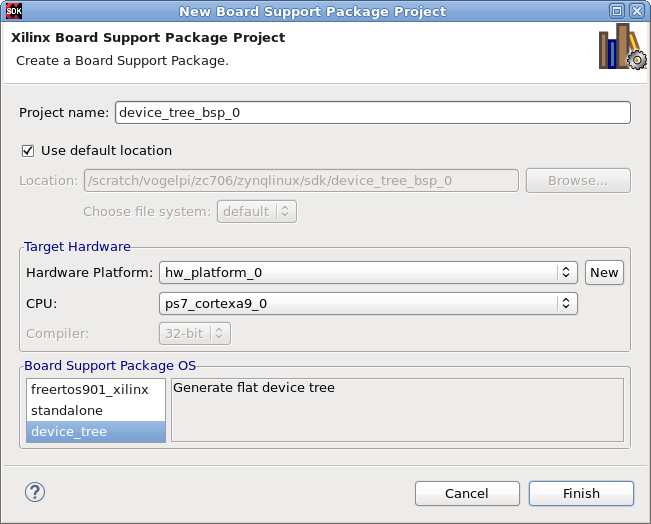
Select device-tree as Board Support Package OS and click Finish. In the next dialog box, the boot arguments for the Linux kernel and the console device to use can be specified. To re-open this dialog box at a alter point in time right-clicking on the device_tree_bsp_0 project in SDK’s project explorer and then selecting Board Support Package Settings. Enter the values as shown in figure below.
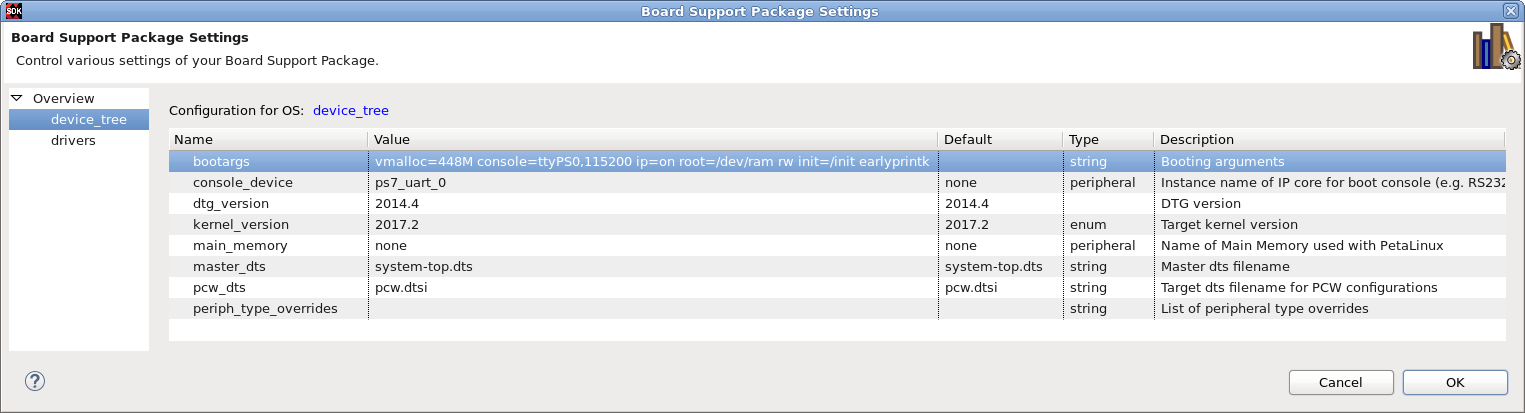
Entering the boot arguments
vmalloc=448M console=ttyPS0,115200 ip=on root=/dev/ram rw init=/init earlyprintk
into the mask will lead the kernel to
- reserve enough virtual addresses at boot time to later map hardware and reserved memory to virtual memory,
- use the
ttyPS0device as default serial console with a baudrate equal 115’200 baud, - mount a random access memory (RAM) disk image as read and writeable root file system (Note that the address at which the RAM disk image is found in RAM is passed to the kernel via boot loader),
- search for and execute the init script in
/init, and - show early boot messages on the default serial console.
With the ip=on statement in the boot arguments, dynamic host configuration protocol (DHCP) support for the system is activated. When connected to a network, it tries to get an IP address from the DHCP server. The server can for example give an IP address based on the media access control (MAC) address of the client. Actually, it should be possible to pass this MAC address to the kernel via device tree but for some reason, this still seems not to be working with the tools. Consequently, this tutorial will show how to set the MAC address as part of the boot loader setup.
Click OK to let the device tree generator create the device tree source (DTS) files (.dts and .dtsi file extensions). If it does not do so automatically, right-click on the device_tree_bsp_0 project in the project explorer and select Build Project. The generated source files can be found inside the folder device_tree_bsp_0 and will later be used for generating the device tree blob (DTB) file (.dtb file extension).
Device Tree Blob
To build the device tree blob out of the sources, we use a tool part of the Linux kernel tree. Navigate to the Linux kernel directory linux-xlnx. Then, run
./generate_dtb.sh
to
- copy the device tree sources from the SDK workspace to the local folder,
- apply the patch
system-top.patchto thesystem-top.dtswhich- alters the device tree such that the main serial terminal of Linux (UART1) is mapped to
ttyPS0and that UART0 (which will print the output of PULP) is mapped tottyPS1, - also includes PULP-specific adaptions specified in
pulp.dtsi, - adds more CPU operating frequency points to make the Linux CPUFreq infrastructure work properly,
- alters the device tree such that the main serial terminal of Linux (UART1) is mapped to
- generate the blob
devicetree.dtband copy it to thesd_imagefolder, - and to convert it back to
devicetree.dtsfor manual inspection.
The adaptions in pulp.dtsi are used to reserve the last 128 MiB of DRAM as contiguous L3 memory and some system DMA channels.
NOTE: If you are using a board different from the ZC706, open the system-top.patch and change "cpu_opps_zc706.dtsi" to
"cpu_opps_zed.dtsi"
to use the default frequencies also safe for lower-end Zynq devices.
First-Stage Boot Loader
To generate the first-stage boot loader (FSBL), again Xilinx SDK is used. Navigate to the folder sdk inside the workspace directory and type
xsdk
to launch the SDK. Click File -> New -> Project and select Xilinx -> Application Project. Click Next. A dialog box similar to the one shown below opens. Enter the values as specified and click Next.
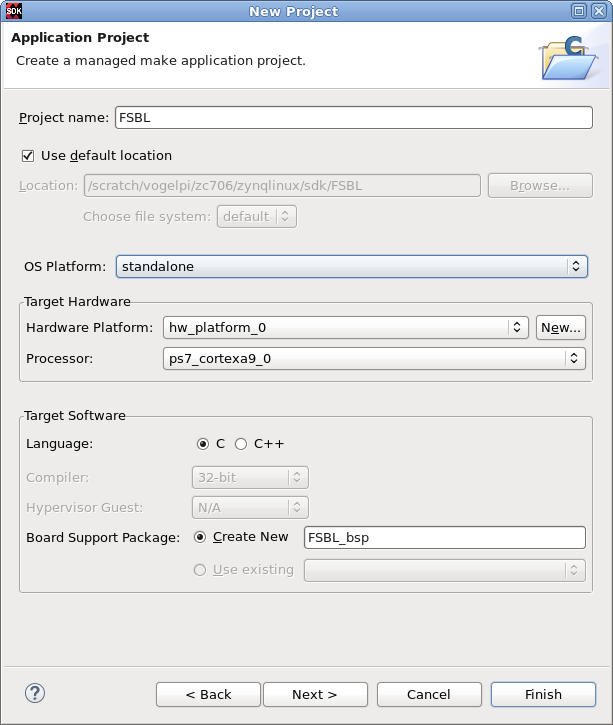
In the template dialog box, select Zynq FSBL and click Finish. The tool should automatically generate the FSBL. The executable can be found in FSBL/Debug/FSBL.elf. If this is not the case, click Project -> Clean and afterwards Project -> Build Project.
BOOT.bin
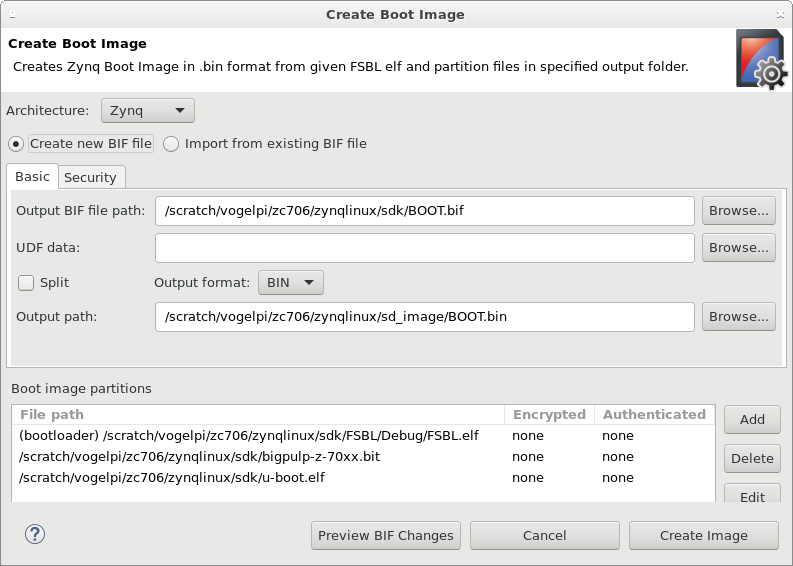
To generate the BOOT.bin containing FSBL, U-Boot image and FPGA bitstream, go to sdk and start Xilinx SDK
xsdk
and click Xilinx Tools -> Create Boot Image. A dialog window similar to the one shown in the figure below opens. Enter the files in the exact same order as shown in the figure and click Create Image. Also note that the file type must be bootloader for the FSBL only and datafile for the others.
Buildroot Root Filesystem
Next, we are going to generate the root filesystem for Linux using Buildroot. Buildroot is a set of makefiles and patches that simplifies and automates the generation of a complete embedded Linux system, including cross-compilation toolchain, root filesystem, kernel and boot loader image.
For this HOWTO, we just use Buildroot to generate the root filesystem. We use the cross-compilation toolchain provided by the Xilinx SDK and separately build the kernel and the boot loader.
Navigate to the buildroot directory inside the workspace and excute
cp buildroot-config_2017.11.2 .config
to use the provided the configuration file. Then, run
make ARCH=arm CROSS_COMPILE=arm-linux-gnueabihf- menuconfig
to start menuconfig. Go to Toolchain -> Toolchain path and make sure it points to the install directory of the toolchain of your HERO SDK, e.g.,
/home/user/hero-sdk/hero-gcc-toolchain/install
Also, check that the Toolchain prefix is correct
arm-linux-gnueabihf
The value for External toolchain gcc version should be 7.x. External toolchain kernel header series must be 4.9.x. Save and exit menuconfig.
An additional source for packages for the target system is BusyBox. It combines tiny versions of many common UNIX utilities into a single small executable and provides replacements for most of the utilities you usually find in GNU fileutils, shellutils, and so on. The utilities in BusyBox generally have fewer options than their full-featured GNU cousins; however, the options that are included provide the expected functionality and behave very much like their GNU counterparts.
In the buildroot directory inside the workspace, execute
make ARCH=arm CROSS_COMPILE=arm-linux-gnueabihf- busybox-source
to download the BusyBox sources. Next, launch menuconfig for BusyBox to initialize the configuration:
make ARCH=arm CROSS_COMPILE=arm-linux-gnueabihf- busybox-menuconfig
NOTE: If your modify the BusyBox configuration, the new configuration will be saved in
output/build/busybox-1.27.2/.config
Save and exit menuconfig. Finally, run
./generate_fs.sh -j8
to build the root filesystem. This script will automatically copy the generated filesystem image to ../root_filesystem/rootfs.cpio.gz for customization.
Note that whenever you add additional packages to an existing root file system, the whole root file system will grow in size. However, if you remove packages, it does not necessarily shrink. It is thus recommended to archive the configuration files together with the generated root filesystem before making any major changes in the configuration. When removing packages to reduce the size of the filesystem, it is recommended to rebuild it from scratch. To do so, execute make clean before generating the root filesystem.
Root Filesystem Customization
Next, the generated root filesystem can be customized.
This step is of particular importance as long as any changes to the root filesystem are not persistent. By default, the root filesystem is copied into RAM at boot time, and is then read- and writeable only in RAM. No changes are written to the image on the SD card. Thus, the system is always in a clean state after a reboot.
As an example, we will now place a script inside /etc/init.d/S45password that sets a root password (have a look at the script to find out the password) at startup such that the system can afterwards be accessed through SSH. Moreover, we will store previously generated SSH keys under /etc/ssh/. We also add scripts to mount an NFS share and to synchronize the system time with a server using the network time protocol deamon (NTPD). Last but not least, the loadable kernel modules prepared during kernel compilation are added to the root filesystem image.
NOTE: The actual SSH keys are not part of the GIT repository for security reasons. They are randomly generated on the target system upon startup. You need to extract and add them to the image after having booted the system for the first time.
Run
./customize_fs.sh
to customize the iamge. Finally, execute
./add_header.sh
to add the U-Boot header to the customized root filesystem image. The generated uramdisk.image.gz is automatically copied to sd_image.
Booting the Generated System
To boot the generated system, an SD card must be prepared and the generated boot images must be copied to this SD card.
Format SD Card
To properly format your SD card, insert it to your computer and type dmesg to find out the device number of the SD card.
In the following, it is referred to as /dev/sdX.
NOTE: Executing the following commands on a wrong device number will corrupt the data on your workstation. You need root priviledges to format the SD card.
First of all, type
sudo dd if=/dev/zero of=/dev/sdX bs=1024 count=1
to erase the partition table of the SD card.
Next, start fdisk usign
sudo fdisk /dev/sdX
and then type n followed by p and 1 to create a new primary partition.
Type 1 followed by 1G to define the first and last cyclinder, respectively.
Then, type n followed by p and 2 to create a second primary partition.
Select the first and last cyclinder of this partition to use the rest of the SD card.
Type p to list the newly created partitions and to get their device nodes, e.g., /dev/sdX1.
To write the partition table to the SD card and exit fdisk, type w.
Next, execute
sudo mkfs -t vfat -n ZYNQ_BOOT /dev/sdX1
to create a new FAT filesystem for the boot partition, and
sudo mkfs -t ext2 -L STORAGE /dev/sdX2
to create an ext2 filesystem for storage. (Do not use FAT for storage because it does not support symlinks, which are needed to correctly install libraries.)
Load Boot Images to SD Card
Copy all the files from the sd_image directory to the boot partition of the SD card. To do so, navigate to the sd_image folder and run
./copy_to_sd_card.sh
NOTE: By default, this script expects the SD card partition to be mounted at /run/media/${USER}/ZYNQ_BOOT but you can specify a custom SD card mount point by setting up the env variable SD_BOOT_PARTITION.
Board Boot Up
Put the card into the board and make sure the jumper settings are such that the board indeed boots from the SD card.
To this end, the Zynq boot mode switch must be set to 00110.
Connect your workstation to the USB-to-UART bridge of the board and open a terminal. Activate the power switch of the board and set up the UART connection by running
minicom ttyUSB0
or
minicom ttyACM0
if you are using a ZedBoard. You should now see the U-Boot welcome screen displayed over the serial console output as shown in the figure below.

Press any button to interrupt the boot process. If you have just installed a new version of U-Boot, type
env default -a
to load the default environment variables provided by the U-Boot image on the SD card. Otherwise, U-Boot might use an outdated configuration found in the onboard flash memory. Then enter the two commands
set ethaddr 00:0A:35:00:01:A1
saveenv
to manually set the MAC address of the ethernet port according to the table below. After saving the environment variables, the MAC address is permanently set. You can now execute run sdboot or reset to continue the boot procedure into Linux.
Dynamic FPGA Reconfiguration
To deploy a different FPGA bitstream without having to fiddle around with the SD card, the programmable logic (PL) inside the Zynq SoC can be reconfigured while the system is running. By default, the corresponding drivers are already installed on the system.
To this end, simply copy the script update_bitstream.sh as well as the new bitstream to the target system. Log in to the target system and execute the script to update the bitstream.
NOTE: It is not safe to load a different bitstream at runtime if this changes the interfaces between the ARM host and the FPGA.