JunoLinux
This page explains how to build and configure the host Linux system for HERO consisting of a Linaro Linux kernel and an OpenEmbedded root filesystem. This HOWTO is for HERO based on the Juno ARM Development Platform (ADP). We refer to this flow as the JunoLinux flow.
Overview
The specific platform used for this HOWTO is the Juno ARM Development Platform (ADP).
The build flow consists of three separate sets of components:
Linaro GCC
aarch64-linux-gnuandarm-linux-gnueabihfcross compilers.The Linaro kernel release not only provides the Linux kernel but also the various boot loaders, ARM Trusted Firmware, power management firmware and the like.
OpenEmbedded/Yocto-based root filesystem.
For further information, check ARM’s website on the ARM reference platform deliverables
NOTE: As of Linaro Release 17.01, the OpenEmbedded root filesystem can no longer be configured and compiled from the sources as ARM and Linaro do no longer provide the required build environment, scripts and Juno-related Yocto layers. Instead, a pre-compiled root filesystem image must be used which is automatically downloaded by the setup script of this HOWTO. This prevents using features such as multilib support (not enabled by default in OpenEmbedded) but allows to use more recent kernel versions.
NOTE: The following table gives an overview on which Linaro releases are supported by this howto, and which configuration requires which Linaro manifest and which GCC version, and then leads to which Linux kernel version and OpenEmbedded root filesystem. The Linaro release version is configured in the env.sh script (see Project Setup). By default, Linaro Release 16.03 is built by this HOWTO.
| Linaro Release | Manifest | Linaro GCC Version | Linux Kernel Version | OpenEmbedded Release | Notes |
|---|---|---|---|---|---|
| 16.03 | latest | 5.2-2015.11-2 | 4.5 | 16.03 | Root filesystem fully configurable, generated from sources |
| 17.04 | lsk | 6.2-2016.11 | 4.4 | 17.01 | Linaro Stable Kernel, pre-generated root filesystem |
| 17.10 | ack | 6.2-2016.11 | 4.9 | 17.01 | Android Common Kernel, pre-generated root filesystem |
For further information, check ARM’s Linaro release notes.
Build system
The following systems were used for this HOWTO:
- CentOS 7 workstation to build the images
- Ubuntu 14.04 workstation connected to the Juno ADP for deploying the images on the board and reading the UART output of bigPULP. This workstation needs to have
linaro-image-toolsinstalled and you need to have root priviledges on this machine. - Bash shell
Required input files
The following files are required for this HOWTO:
- the helper scripts provided in the
hero-supportGIT repository bigpulp.bitbitstream file generated by Xilinx Vivado includingSITE2directory structure containing Juno configuration files (provided by thejuno-supportGIT repository).
Generated output files
The following files will be generated throughout this HOWTO:
Boot files for the Juno ADP comprising Linux kernel image, bootloaders, device tree blob etc.
OpenEmbedded root filesystem image.
To boot the platform, these files need to be copied to the boot partition Juno ADP and the root filesystem image must be deployed on its hard disk.
Project Setup
Create a new workspace directory on your local scratch partition. Throughout this HOWTO, we assume this directory to be
/scratch/${USER}/${BOARD}/junolinux
Where ${BOARD} has been set to juno for this HOWTO.
Copy all files from within linux/junolinux/ inside hero-support to the new workspace directory. Navigate to the workspace directory, open env.sh to configure the Linaro Release version (LINARO_RELEASE) and run
./setup.sh
to build up the required directory structure, download the GCC cross compilers inside gcc-linaro, clone the required Linaro GIT repositories, checkout the proper tags, copy the provided helper files to the appropriate directories, and patch the device tree source file for bigPULP.
Project Build
Navigate to the workspace directory and run
./build.sh
to trigger the build process.
This will generate the Linaro kernel release consisting of the following main output files:
the Linux kernel image under
arch/arm64/boot/Imageinside the kernel build directory.the device device tree blob under
arch/arm64/boot/dts/arm/juno*.dtbinside the kernel build directory.loadable kernel modules under
lib_modulesinside the kernel build directory (these need to be copied to the root filesystem once the Juno ADP is running).
The kernel build directory is
linaro_${LINARO_RELEASE}/workspace/linux/out/juno-oe
or
linaro_${LINARO_RELEASE}/workspace/linux/out/juno/mobile_oe
for Linaro Release 16.03 or newer, respectively.
NOTE: the actual kernel configuration .config can also be found in this folder.
The generated output files can also be found under
linaro_${LINARO_RELEASE}/workspace/output/juno-oe/uboot
or
linaro_${LINARO_RELEASE}/workspace/output/juno/juno-oe/uboot
for Linaro Release 16.03 or newer, respectively. To boot the system, these files need to be copied to the boot partition of the Juno ADP together with the files generated in
linaro_${LINARO_RELEASE}/workspace/recovery
For Linaro/OpenEmbedded Release 16.03, build.sh will also compile the OpenEmbedded root filesystem. The generated root filesystem image can be found under
oe_${OE_RELEASE}/openembedded/build/tmp-glibc/deploy/images/genericarmv8/linaro-image-minimal-genericarmv8.tar.gz
This image will need to be deployed on the internal hard/solid-state drive of the Juno ADP.
Deploy Images
Deploying the generated or downloaded images on the Juno ADP requires access to and root priviledges on the workstation attached to the serial interfaces of the Juno ADP.
The name of this machine is configured in the JUNO_WORKSTATION_TARGET_HOST variable in the env.sh script.
Further information about how to deploy the images on the Juno ADP can also be found on ARM’s website.
Preparation
First of all, make sure the variable JUNO_WORKSTATION_TARGET_HOST in the env.sh script is properly configured and
source env.sh
source the environment.
Make sure the SITE2 directory containing the output of the hardware build is placed under
bitstream/bigpulp/SITE2
In your workspace. Then, run
./prepare.sh
to copy the generated or downloaded images as well as a set of helper scripts to this workstation.
Boot files
NOTE: This step requires root priviledges and if not used carefully, can destroy data on your workstation.
To install the boot files, open two terminals and connect to the workstation
ssh ${JUNO_WORKSTATION_TARGET_HOST}
With the first one, execute
cd ${JUNO_WORKSTATION_TARGET_PATH}
./deploy_boot_files.sh
and then follow the instructions of the script using the second terminal.
Root filesystem
NOTE: This step will destroy any modifications made on the root filesystem of the Juno ADP. You should create a backup before modifying the root filesystem.
NOTE: This step requires root priviledges and if not used carefully, can destroy data on your workstation.
To deploy a root filesystem image previously generated or downloaded, you need to first power down the Juno ADP and unplug the internal hard/solid-state drive of the Juno ADP. Plug it in to workstation.
Then, execute
ssh ${JUNO_WORKSTATION_TARGET_HOST}
cd ${JUNO_WORKSTATION_TARGET_PATH}
./deploy_rootfs.sh
to connect to the workstation and start the script for depolying the root filesystem. The script can take several minutes to finish.
Once the script has finished execution, connect the drive back to the Juno ADP and start it. When it is up and running, also execute
./deploy_modules.sh
to modify and copy the loadable kernel modules generated during Linux kernel compilation from custom_files/lib/modules to the new root filesystem.
Bootloader configuration
Open a new terminal, connect to the Ubuntu workstation attached to the Juno ADP using SSH and then open the serial console of the Juno ADP
ssh ${JUNO_WORKSTATION_TARGET_HOST}
minicom ttyUSB1
and boot the board by typing
reboot
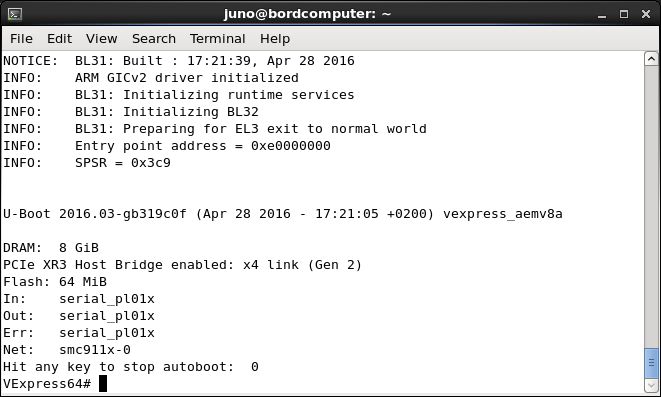
into the console. The board is now starting up. It first configures the various FPGAs in the system and then launches the U-Boot bootloader. When you see the U-Boot prompt in the figure below, press any button to interrupt the boot process and enter the U-Boot configuration.
First of all, type
env default -a
to load the default environment defined in the binary U-Boot image. Otherwise the environment will be loaded from an onboard flash memory. To see all environment variables, you can type printenv. Type
set ethact smc911x-0
set ethaddr 00:02:f7:00:63:11
to configure the second ethernet interface and
set stderr serial_pl01x
set stdin  serial_pl01x
set stdout serial_pl01x
to make sure the serial terminal is used for stderr, stdin and stdout.
Finally, type
saveenv
boot
to save the modified environment to the onboard flash and to boot Linux.
Run the Juno ADP
First, open 4 terminals on your workstation and use SSH to connect to the Ubuntu workstation connected to the Juno ADP:
ssh ${JUNO_WORKSTATION_TARGET_HOST}
With the first two terminals, connect to the UART devices of the Juno board:
minicom ttyUSB1
minicom ttyUSB0
The first one connects to the main device. If Linux is not yet booted, it connects to the Motherboard Configuration Controller (MCC). To boot the board, symply type
reboot
in the terminal connected to ttyUSB1. During the Linux boot process, this terminal is taken over by the Linux kernel which will print its log here. The other device ttyUSB0 can then be used to control the board over the MCC, for example to initiate a reboot if the system crashes.
The third terminal can be used to connect to the Juno ADP over SSH
ssh root@arm-juno
and will be used to launch applications on the ARM host.
The fourth terminal is used to interface the MicroBlaze Debug Module connected through the Xilinx Platform Cable. To do so, set up the environment variables required by the Xilinx SDK and type
xmd
to launch the Xilinx Microprocessor Debugger (XMD). Afterwards, connect to the MicroBlaze Debug Module
connect mb mdm
and start the JTAG UART terminal
jtag_terminal
which will launch a separate window to display the output of bigPULP. In case the Juno ADP needs to be rebooted, make sure to re-establish connection with the MicroBlaze Debug Module and restart the JTAG UART terminal. To disconnect the XMD from the MicroBlaze Debug Module, type
xdisconnect -cable
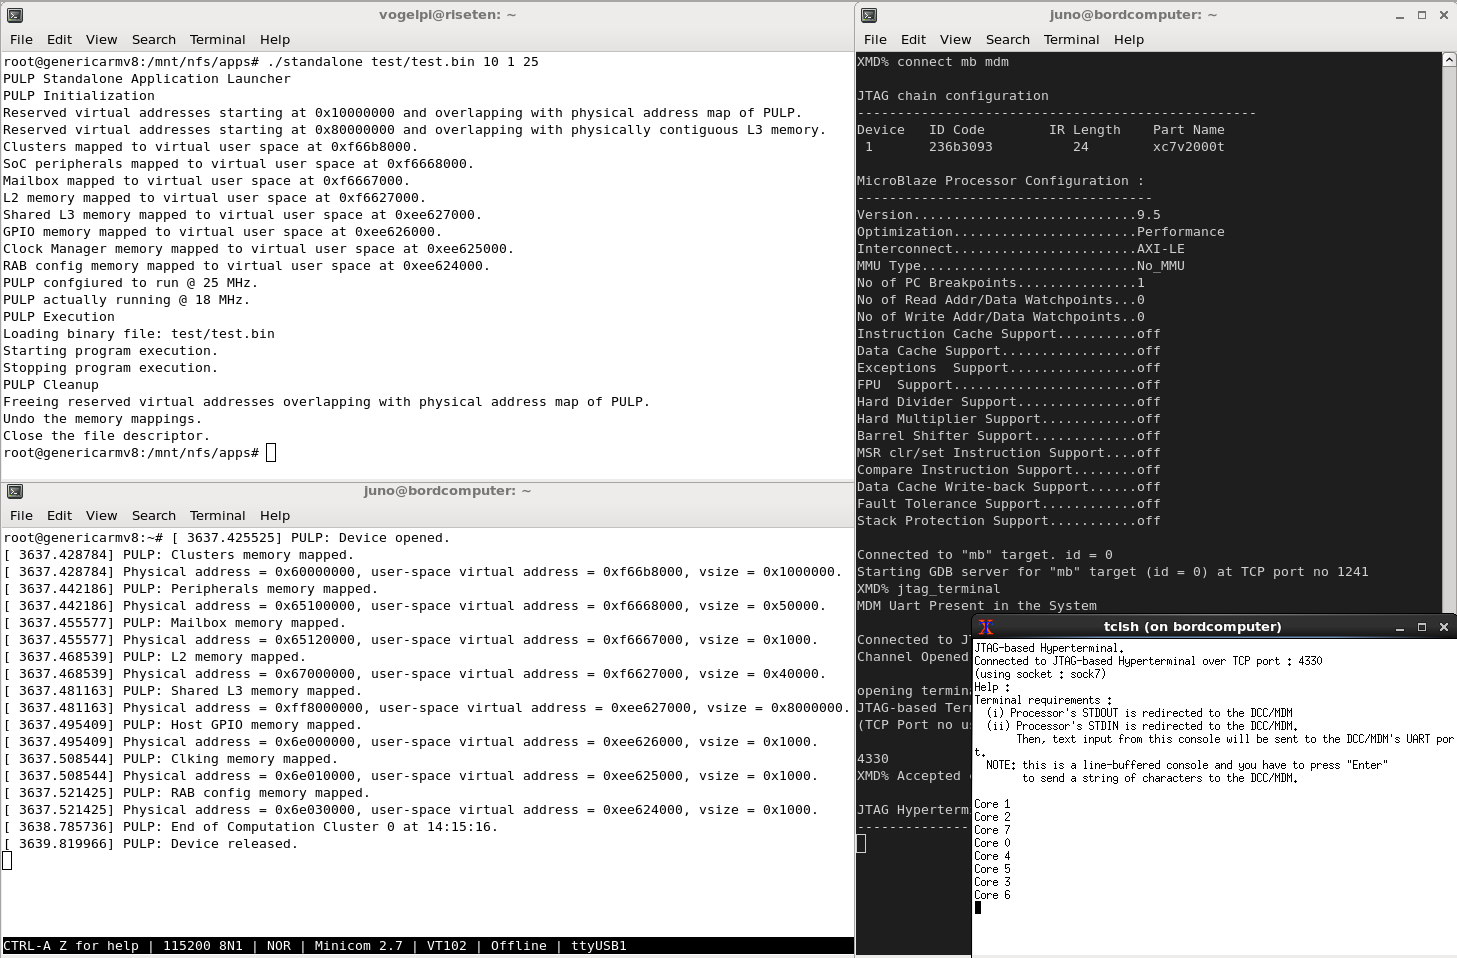
Executing an application, such as a Helloworld standalone application on bigPULP will then produce the following output: Output of the standalone application launcher started on the host (top left), output of the kernel-level driver (bottom left), XMD (right), output of bigPULP visualized using the JTAG UART (bottom right).
Customization of the Build
This HOWTO comes with scripts to both customize the Linux kernel and the root filesystem (Linaro Release 16.03 and older only).
Kernel
To customize the kernel, source env.sh to setup the environment and then navigate to the kernel source folder
linaro_${LINARO_RELEASE}/workspace/linux
to execute
./menuconfig.sh
Make your changes to the kernel configuration, save them and exit menuconfig.
Then, execute
./compile_kernel.sh
to rebuild the kernel and the device tree, and
./compile_modules.sh
to rebuild the kernel modules.
Root filesystem
NOTE: This set of steps only applies to OpenEmbedded Releases 16.03 and older.
The previously generated root filesystem image is built according to a default recipe. The OpenEmbedded build system allows to add additional packages if needed. If for example an additional tool is required that is part of BusyBox, the following steps are required.
First of all, open an xterm window on your workstation and navigate workspace directory
cd /scratch/${USER}/${BOARD}/junolinux
and source env.sh to configure the environment. Then navigate to the OpenEmbedded workspace directory
cd oe_${OE_RELEASE}
and execute
source source_oe.sh
bitbake -c menuconfig busybox
to source the OpenEmbedded environment and launch BusyBox menuconfig. Make your adjustments, save the configuration and exit.
Then, execute
bitbake -c diffconfig busybox
to generate a configuration fragment for the adjustments you just made. Type
recipetool appendsrcfile -w /scratch/${USER}/${BOARD}/junolinux/oe-${OE_RELEASE}/openembedded/meta-openembedded/meta-oe \
busybox /scratch/${USER}/${BOARD}/junolinux/oe-${OE_RELEASE}/openembedded/build/tmp-glibc/work/aarch64-oe-linux/busybox/1.24.1-r0/fragment.cfg
to tell OpenEmbedded about the adjustments. Open the file
recipes-core/busybox/busybox_%.bbappend
and remove the string ;subdir=busybox-1.24.1 from the definition of the variable SRC_URI.
Finally, run
bitbake linaro-image-minimal
to rebuild the root filesystem using the new configuration.
Instead of deploying the new root filesystem image found under openembedded/build/tmp-glibc/deploy/images/genericarmv8/linaro-image-minimal-genericarmv8.tar.gz as a whole (this would destroy any modifications you applied on your existing root filesystem), you can just reinstall the modified BusyBox package.
To do so, boot the Juno ADP and copy all the package files generated by OpenEmbedded in openembedded/build/tmp-glibc/deploy/ipk to the Juno ADP. Login to the Juno ADP, navigate to the ipk folder just copied. The BusyBox package can be found inside the aarch64 folder.
Type
opkg install --force-reinstall busybox_1.24.1-r0_aarch64.ipk
to install it using the OPKG Package Manager.
NOTE: In case, OpenEmbedded fails to generate the root filesystem with the modified package, it may help to disable multilib support by removing it from the configuration in openembedded/build/conf/local.conf and openembedded/openembedded-core/build/conf/local.conf. If you do this, you are forced to install the new/modified package using OPKG instead of deploying the entire root filesystem. Otherwise you will loose multilib support.